Friday, August 24, 2012

Head Shoulders Knees and Toes: Kids songs and muscular relationships


Do you remember the song “Head, Shoulders, Knees, and Toes?” I happen to live with a four year old who loves all things bone, so these songs are very much a part of my consciousness.  I always find it remarkably funny how much these “body” songs are connected to the work that I do.   “Head, Shoulders, Knees, and Toes” is clearly a song about the first scan in a postural assessment.  First, I see if the head is even between the shoulders, I look to see if one shoulder is higher than the other, I see if the knee caps are pointing straight forward, I check where the toes are pointing, and then I look back at the knees to see if they line up with the toes.  There you have it: head shoulders knees and toes, knees and toes! Throw in some pelvis alignment and we’ve got ourselves a kid’s song!  Of course there’s more to it, but that’s where I start.  These bony landmarks are a great way to assess the relationships within the musculoskeletal system, which brings me to this week’s installment of “how do you remember all that?” Last week I talked about the Latin names of muscles as pneumonic devices that actually make it easy to remember them, this week I’ll talk about remembering muscular relationships because in actuality there would be no “Head, Shoulders, Knees and Toes” without the relationship between fascia, muscles, and bone.  I’ll finish with a story about a client who benefited directly from knowledge of these relationships.

The following memory tricks are based on the work of Tom Myers who developed Anatomy Trains as a way of analyzing muscle relationships in function.   When you are remembering relationships, muscular names are not necessary to achieve great function.  Tom Myers would go so far as to say that perseverating on the actions of individual muscles might even impede healthy function.  In real life no muscle acts alone, so isolating individual muscles does not create functional strength.  In general when I think of muscle groups I think Back, Front, Side, Inside and Spirals…These of course correlate to Tom Myers’ Superficial Front Line, Superficial Back Line, Lateral Line, Deep Front Line, and Spiral Line (along with his arm line and functional lines) The lovely thing about Tom Myers’ work is that while the theory can explain incredibly complex ideas with great detail and accuracy, it’s simplicity can also be broken down for anyone to understand and use for greater movement efficiency.

When I think of the Back of the Body (Superficial Back Line), I think of the bottom of the foot, the back of the lower leg, the back of the thigh, the back of the hips, the spine, the back of the neck and the skull wrapped around to the forehead.  These body parts work together to propel the body forward, hold the body upright, and bend the body backwards.     

When I think of the Front of the Body (Superficial Front Line), I think of the top of the toes, the front of the shins, the front of the thighs, the belly, the chest, the front of the neck, and the face.  These body parts curl the body into a ball, help us bend forward, and pull our body forward through space.

When I think of the Side of the Body (Lateral Line), I think of the bump on the side of the ankle (lateral malleolus), the side of the lower leg, the side of the thighs, the side of the hip, the waist, the side of the ribcage, and the side of the neck.  These muscular relationships help us bend to the side, and transfer weight so that we can lift one foot while walking.

When I think of the Inside of the Body (Deep Front Line), I think of the deep fascia in the foot, behind the bones of the lower leg, the inner thighs, the inside of the pelvis, right along the front of the spine, and believe it or not the tongue.  These muscular relationships are our center or our core.  They move the legs, stabilize the pelvis, and hold us up from the inside (think of a tent pole).

When I think of Spirals in the Body, I imagine a rubber band or string that connects the right ear to the left shoulder blade, then it wraps around the left side of the ribcage, and runs across the abdomen to the right hip.  Then this rubber band continues down the right inner thigh, moves around the front of the right lower leg, wraps around the bottom of the foot from the inside of the ankle to the outside of the ankle. Our imaginary rubber band continues to move up the side of the lower leg, and then up the back of the thigh.  Phew…I like to think of these Spiral relationships as the balancers in the body.  Imagine this scenario: If imbalances on the inside of the body cause the ribcage to rotate to the right, then the spirals in the body can adjust the head neck and shoulders so that anyone with this spinal rotation doesn’t have to spend his or her life walking around in a circle (yay for homeostasis).     

Now of course these descriptions are quite simplified. Basically I reduced Anatomy Trains into five paragraphs, which in many ways is a travesty to the depth of information in this fabulous book.  But if you’ll forgive me, I want to explain how I used the simplicity of this in depth theory with a client recently.  This person returned to The Pilates Studio after a time away, and as she was communicating the “status” of her body, she talked about a shoulder that was causing pain.  After some conversation, we both determined that probably there was some sort of impingement in the shoulder, and I certainly had a few movement recipes in mind for her shoulder.  Then she said something that gave me pause.  She talked about feeling tightness over her entire body.  She has some scoliotic rotations in the spine, which we had worked with in the past, but the stiffness she spoke of was not something I had heard from her before.  This led me to a different strategy with her, even though I knew what I wanted to do for her shoulder I decided to postpone shoulder specific exercises for a few sessions.  

First we worked with the relationship of the back of the body to the front of the body. We bent forward and backward, we released tight spots and strengthened weak spots.  We played with flexion and extension of the spine.  We worked to make the bottom of the feet malleable, and we played with flexion and extension of the ankle and the hip.  Then we began working with the side of the body and the inside of the body.  We flexed the spine from side to side.  We strengthened the side of the hips. We lengthened the muscles that run in front of the spine. And finally we played with spirals.  I used the very simplified information as a structure to choose Pilates exercises, and my only goal was to relieve the feeling of stiffness.  The funny side effect was that well, her shoulder started feeling better before I ever addressed it directly.  It wasn’t perfect, but the range of motion improved, and the pain decreased.  By the time we started working with shoulder motion directly, we were working with a shoulder that was not as acute as the beginning of her sessions.

Now one of my pet peeves is using an anecdotal story (like the one I just told) and then spouting causal relationships as if the anecdote of one person’s movement experience proves anything.    I could list so many other things that could have contributed to this client’s decrease in shoulder pain.  There was no “control” in our work together, we were simply two people problem solving and moving together.  We allowed ourselves to be creative, and now I have another anecdote that I can add to the plethora of anecdotes that have shaped my practice over the years. 

Well then what do I know? I do know that working with muscular relationships rather than isolating individual muscles will create a powerful movement experience for any person.  I also know that if you watch a baby rolling around on the floor, you will see that we are born with this innate knowledge that somehow disappears.  I also know that “Head Shoulders Knees and Toes” has been running through my head since I started writing this post, and I hope that I have not passed that onto you.  But beyond that I am simply a mover that is teaching other people to move, and if you’re still wondering how I remember all that…Just think about all of the connections in your world that allow you to remember all that you do, and well that’s how I remember all that.

Katrina Hawley C.M.A, R.S.M.E
Co-director of The Pilates Studio

Thursday, August 16, 2012

The Latin in Muscle Names can be Helpful?

The other day, a client asked me how is it that I can remember the muscle names so easily.  I started explaining how I had been studying anatomy forever, and with practice these names start to come easier, but then I remembered something.  My very first anatomy teacher while staring at a group of nineteen-year-old college students, once said, “Remembering the names of muscles is easy.” Of course our angst-ridden response was probably, “Maybe for you.” But then she went on to explain something.  Each muscle name is descriptive.  The muscle names most often do one or two of the following things:

1.     Describe the shape of the muscle
2.     Describe the consistency of the muscle
3.     Describe the function of the muscle
4.     Describe the location of the muscle

And with that she went on to say remembering these four rules will make learning the musculo- skeletal anatomy easy because each name is a pneumonic device.  I was a very skeptical nineteen-year-old, so much so that until the day my client asked me how I remembered the muscle names, I had blocked out this learning process entirely.  But the memory has come back and I now realize that every time someone says Quadratus Lumborum, I automatically think “Square muscle next to the Lumbar spine” or if somebody says Adductor Magnus, I automatically think, “The really big one.”  First of all my professor of so many years ago was absolutely right, and she was such a great teacher that it was years before I realized exactly how much she taught me.  So here’s a shout out to Professor Dee Forrest at Western Wyoming College, because in the publish or perish world of universities, I want to honor a professor that was also a great teacher. 

The following is a list of the Latin Pneumonics that have been burned into my brain…For the Latin experts out there, I have never ever taken a Latin class; so if there are any inaccuracies please except my apologies.  That’s the best thing about pneumonic devices they help me remember the muscles whether the Latin is accurate or not.  At nineteen I learned a great way to remember muscle names and at thirty one after quite a few years in practice, I learned an even better way to think about muscular relationships, and that will be the subject of next week's post!  Stay Tuned!   

Muscle names that describe the shape of the muscle: Often the shape and the location go together so some of these names have both a shape and a location descriptor.  (I found a few pictures to show some of the shapes)

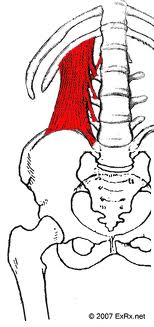
Quadratus Lumborum: Square muscle next to the lumbar spine

Quadratus Femoris: Square muscle close to the femur

Gluteus Maximus: The big glute

Gluteus Medius: The medium glute  

Gluteus Minimus: The little glute

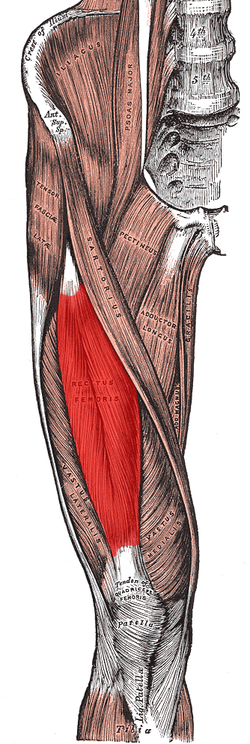
Rectus Femoris: up and down the femur (thigh)

Rectus Abdominis: up and down the abdomin

Triceps: Three heads

Trapezius: Trapezoid

Serratus Anterior:  Serrated muscle in front

Serratus Posterior: Serrated muscle in back

Muscle names that describe the consistency of the muscle

Semi-tendonosis: tendon like muscle

Semi-Membranosis: muscle that is gooey like a membrane

Gracilis: muscle like gristle

Muscle names that describe the function of the muscle

Erector Spinae: Muscle that keeps spine erect

Multifidi: Multifunction muscle of the spine

Rotares: rotates the spine

Flexor Hallucis Longus: Flexes the big toe (its also long)

Extensor Hallucis Longus: Extends the big toe

Flexor Digitorum Longus: Flexes the other toes

Extensor Digitorum Longus: Extends the other toes

Adductor Longus: Adducts leg

Adductor Brevis: Adducts leg

Muscles that describe the Location of the muscle

Tibialis Anterior: Muscle in front of the Tibia

Tibialis Posterior: Muscle in back of the Tibia

Biceps Femoris: Two headed muscle on the femur

Biceps Brachii: Two headed muscle on the arm 

Wednesday, August 8, 2012

Breath: The Olive Oil of any Pilates Exercise!


We’ve all heard of super foods and the “miracles” that they create…But whenever I hear someone speak of the benefits of olive oil, I find myself wondering how awesome I’d be if I could take a shot of olive oil at every meal.  Seriously I’ve almost bought a shot glass for this very purpose…It’s so simple and easy to use, and olive oil can literally cure ills.  The “miracle” that I feel in olive oil is that it is not pharmaceutical.  olive oils aren’t concocted in chemistry labs; olives grow on trees and are pressed for oil.  Why isn’t olive oil the most obvious choice?  Why don’t we start with olive oil?  Actually many recipes do start with olive oil…

This brings me to the Pilates Exercise of the Day Recipe Cards.  So far we have created recipes for agile feet and strong and flexible ankles, and for the last ten days the Pilates Exercise of the day has been a different breath pattern.  I’m sure that you have been waiting with baited breath for the breath recipe card.  Well, my friends that would be like handing you a recipe card listing ten different kinds of olive oil and calling it soup.  Breath is the beginning; it is the place to start.  It is the one principle of pilates that is consistent in all of the pilates studies and writings.  Breath is the olive oil of any Pilates Recipe.

Just this morning I was working with a new client, and she told me about a muscle spasm underneath her shoulder blade that happened every time she performed certain actions.  As she was talking about the movement that this mystery spasm prohibited, I started mapping out a strategy in my mind, a recipe of sorts.   Well this recipe started with breath.  I watched the action of her breath. Then I placed my hand on the place that hurt, asked her to breath into my hand.  She took a few breaths, and I felt the tissue under my hand expand.   Suddenly, she sat up and said, “It’s gone!”  And then preceded to do all of the movements that she had just told me were impossible because of this pain underneath her shoulder blade.  Now, this was no miracle. It just so happens that she had never cooked with olive oil before.  

Is a years worth of pain relieved every time I ask someone to breath into my hand?  Is breath that much of a miracle?  Of course not!  This woman had tried many things to relieve this pain, but this was the first time that her “recipe” had breath as the first ingredient.  During the session, we continued to move and correct muscular imbalances that may have helped to cause the pain, but we started with breath, just like lots of great and healthy recipes start with Olive Oil.   

So now below when I list links to the breath patterns on the Pilates Exercise of the Day Blog, consider it as a shelf full of gourmet olive oils.  Each with subtle variations to get the most out of any Pilates exercise. 

Katrina Hawley C.M.A, R.S.M.E
Co-Director of The Pilates Studio

P.S.  As I was sitting at Esselon cafĂ© typing this blog post Jenni one of the fabulous instructors at The Pilates Studio, who you might only know as the model in the Pilates Exercise of the Day Blog, came in and asked about the post.  As we were chatting, she laughed and told me how sore her deep abdominal muscles were the day after we took all of the breath pattern pictures. …Hmmm another reason to always start with the breath!


Tuesday, July 31, 2012

Recipes for a Balanced, Strong and Flexible Ankle


In the last post, we talked about foot and ankle agility, and listed exercises from the Exercise of the Day Blog that help create a pliable and adaptable foot.  In this post, I hope to create recipe cards for both ankle strength and ankle flexibility.  Simple calf raises are a great place to start with ankle strength, but there are lots of variables to consider.  Deciding which exercises to do can seem overwhelming, so to get started let’s first answer a few questions. 

First, let’s start this with a marker exercise.


While doing this exercise notice if your kneecap is in line with your second and third toe.  Notice the pathway of the ankle as it rises.  Does it move smoothly in a straight line centered over the heel, or does the ankle fall to the outside or the inside? Is it easy to stand on your toes or are your ankles wobbly?  Are the backs of your legs cramping at all?  How is your balance?  Do you feel secure?

Now after performing the marker exercise and considering the previous questions, it’s time to decide which ankle exercises are the best for you!

If your ankle moves to the outside when you rise up on your toes, you may want to start the following exercises, follow the links for further explanations of each exercise:


After completing these exercises, try your marker exercise again to see if there is a difference.  If your ankle still feels wobbly, you might need to develop more strength in the tendons around your ankles in a non-weight bearing environment.  Follow the following links to see what these exercises can accomplish.


Next, let’s look at some variations that will help release cramping feet.  The increased range of motion in these exercises can help lengthen the muscles in the back of the leg, and so then release any hamstring, calf, or foot cramps.


But wait! What if your legs are cramping but your kneecaps are also having trouble staying aligned with the second and third toe?  Not to worry, you can address both of these issues at one time.


Finally what about balance?…Were you wobbly when you did the marker exercise?  If your goal is to improve your balance, it is important to put your body in situations that are a little more precarious.  To improve balance you must challenge the balance.  Try these exercises if balance improvement is your goal.


 Single Leg Balance on Full Foam Roller


Now that you have read these ideas try some of your own combinations.  The best part of having a variety of exercises at your disposal is to be able to vary your workouts from day to day.    Maybe one day you want to work on foot agility, and maybe on another day you’ll be improving balance.  Keeping the ankle strong, flexible, and the foot supple requires time outside of shoes.    Play with these exercises OR if you have one that you love even more than these, feel free to let us know in the comments! We might just post it on the Exercise of the day blog

Katrina Hawley C.M.A., R.S.M.E
Co-director of The Pilates Studio
Wednesday, July 25, 2012

The Recipe for an Agile Foot!


Have you seen our new blog??? Check out The Pilates Exercise of the Day Blog.  When you click on the link you may notice, “Wow July is an entire month of foot and ankle exercises…hmmm”  You might have allowed a few questions to pop into your head.  Should I do each of these everyday?  OR isn’t pilates about core strength?  What do my feet have to do with my core?  Well the next few blog posts are to serve as your recipe cards for July’s foot and ankle exercises, and hopefully the rest of this post will answer why foot and ankle exercises are important to Pilates, and more importantly, this recipe and the many recipes to come, will make the Exercise of the Day Blog more practical and useful to all of us!

To answer the first question, Should I do each of these exercises everyday?  If only we all had the time, Right?  Yes, it would seem slightly ridiculous to do 30 foot and ankle exercises per day, and of course some of the exercises might seem a little bit redundant.  To help you create your own ankle workout, I have divided the exercises into a few groups, and I have a few suggestions on how to create a workout that is specific to your goals and needs.  Read the next few posts and you’ll get a sense of how important the feet are to me.  They are our foundation, our connection to the earth, and our brakes.  They keep us safe, and the move us forward.  Yay! for the feet!  

Foot and Ankle Agility

When I think about foot and ankle agility, I am reminded of the fact that our feet are in shoes almost all of the time.  We never run around in the dirt like we did when we were kids.  The calluses on our feet are from shoes not monkey bars.  Our toes are beginning to squish together.  This is not helpful to our feet or the rest of our bodies.  Yet, when our feet lose agility and little problems pop up, instead of taking our feet out of shoes, we add orthotics to the mix.  Let’s shift the paradigm… Let’s get the feet moving, and maybe just maybe the world will change (Think I am exaggerating for effect?  Think again!!) 

Imagine your foot as a spring that takes in the shock of each step and disperses it through the rest of the body.  What happens if the number of different fascial pathways from the foot to the rest of our body becomes limited? The body will be absorbing shock that is dispersed over a limited area instead of a vast and flexible web of fascia.  Joints might get more wear and tear and begin to degrade?  How does your heel feel?  What about the inside of your knee?  What about your low back or neck?  The list of foot agility exercises below is by no means complete, but it is a place to start.  Check out these links, and pick your favorites.  You could do each exercise every day, or you could vary it from day to day.  This is your body and the exercises you do are your choice…Give your feet the freedom to move and improve!

Just to clarify, I am not on a crusade to rid the world of orthotic inserts. I am on a crusade to get the feet moving in all directions.  Let’s tap the toes, Let’s spread the toes.  Let’s scrunch them, twist them, and spiral them, Let’s do everything we can to pick up tiny little objects.  Ready set go! Let’s make agile feet!


You'll notice that today is July 25th and there are more foot agility exercises to come!  Consider checking out the Pilates Exercise of the Day Blog tomorrow!  And of course later this week come back to this blog to see the recipe cards for Ankle Strength, Ankle Flexibility, and Balance Improvement!  
  
Katrina Hawley C.M.A, R.S.M.E
Co-Director The Pilates Studio