Thursday, September 20, 2012

Pilates Exercises for a Great Tricep Workout: Part I


Today a client came in with a copy of a short article entitled “Ending the Under-Arm Jiggles.”  It had a few exercise suggestions, and I read it and said well I can’t believe I haven’t written a blog post about the triceps yet!  I thought back to the many times that someone came in with the goal of toning the arms, especially the triceps, and realized that most often the “underarm jiggles” are about shoulder instability and not about the tricep weakness at all!  We’ve been spending years at the gym “toning our triceps” when in fact we should have been learning how to move!  

Think about it.  How much do we use our arms in everyday life?  If our shoulders are moving efficiently then the triceps are working along with the rest of our arms when we type, wash the dishes, make the bed, hit a tennis ball, go swimming, open a door, write a check, or hold onto a hand railing.  If our shoulders are moving efficiently then we don’t have to do tricep-isolating exercises because our triceps are working all day long! 

Now I have posed this solution as if snapping the fingers will lead to magic efficiently moving shoulders, but unfortunately I’m afraid that is not the case…Our shoulders fall into repetitive movement patterns just as easily as our knees, hips, and back.  Our lives that keep us at the computer longer than we want, and the repetitive movements in our work and home life keep our hands in front of us, and then when we finally get to exercise the habits that are created during our lives stay and are there even when doing tricep exercises.  SOOOO what now?  Is it hopeless??? Absolutely not!!!

Let this blogpost be your first step! The following exercises will soon be on the Pilates Exercise of the Day Blog they will help you release the shoulders, and allow you to become aware of the relationship between the collarbone, the shoulder blade, and the upper arm bone.  This relationship is crucial to arms for an even muscle tone.  Once the shoulders have loosened up and your body has a deep understanding of the movement of the shoulders, the tricep exercises that I list next week will be so much more effective and beyond that, every arm movement that you do will be working the arm evenly!

First we have Elbow Circles on the Foam Roller


This exercise teaches the body how to use the collar bone and the shoulder blade.  When we think of arm movement often we are only aware of the shoulder socket, but in actuality there are three joints that are involved in all arm movement.  We have the Gleno-Humeral Joint (arm bones connected to the shoulder blades) the Acromio-Clavicular joint (shoulder blades connected to the collarbones) and finally the Sterno-Clavicular joint (collarbones connected to the Breast Bone).  These three joints create the range of motion that we have at our shoulders and as I said before when we spend most of our days with our hands in front of us, it gets harder to use our full range.  

To do these Elbow Circles lay on your foam roller, and place your hands on your shoulders, begin drawing circles with your elbows and then gradually let these circles become larger.  Become aware of the way that the arm bone moves in the socket.  Allow the collarbone to open as you circle the arm back.  Allow the shoulder blade to move as you circle the arm forward.  Be sure to keep the arm connected to the socket as you continue these circles in both directions.

Now take a break and find your way to sitting.  How do your shoulders feel?  Are they warm?  Do you feel additional width across the front and the back of your shoulders?  Have they dropped?

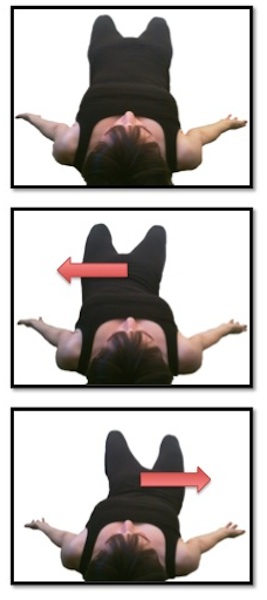
Next we will do Snow Angels on the Foam Roller

This exercise will help you find balance between the front and the back of the shoulders.  Once again because our hands are in front of us during most of our days, the muscles that run along the front of the chest get short and pull the shoulder joint forward, which makes it nearly impossible to engage the tricep.  The Snow Angels will help open the chest so that next week when the strengthening exercises come, your triceps will be available to you!

To do the Snow Angels lay on the foam roller and let your arms open out to the side so that your chest is open.  Then as if you are laying in powdery snow begin creating your angel wings by letting your arms move towards your head and then towards your pelvis.  Always trying to have the fingertips reaching to the ground.  Find the place that feels the most stretch, rest there, and breathe into the chest!

After this find your way to standing and try to engage your triceps.  Do you feel the entire muscle?  As you move your arm can you feel the tricep participating?

What Now?
Now you get to do me a favor! try these exercises on for a week.  If possible try to do them in the morning and right before you go to bed, and then in a weeks time, I will write the second part of this post that will have plenty information about strengthening exercises and even a video to go with it!

Katrina Hawley C.M.A, R.S.M.E
Co-Director of The Pilates Studio

Wednesday, September 12, 2012

Recipes to Release the Back


Imagine the gravity of the earth constantly pushing you to the ground.  Take note of how much of the day you spend sitting.  How is your posture when you’re not thinking about it? Now think about your low back.  Is it “tight?”  Is it sore?  Should it be stretched?  Should it be strengthened?  Does it have a curve?  Is it flat? Is it sore in the morning? The afternoon?  Can you pick up heavy things without pain?  How does it feel when you sit?  What about when you walk up stairs?  What about after a strenuous workout, how does it feel then?  Is that enough questions for one blog post?  Have I illustrated how overwhelming deciphering back pain and what to do about it can be???  The following recipes are a very good first step.  Often when back pain arises simply taking a step back and allowing your body to do some recuperative exercises is a way to calm the nervous system. It’s also a great way for you to listen to your back, a way to see if maybe your back can answer some of the questions I posed for you.

First, let’s talk diaphragm!  The diaphragm exists at the top of the low back and is one of the big reasons that the first step in any release recipe is finding the breath and using the breath.  In “Breath the Olive Oil in any Pilates Exercise” I talk about how sometimes the breath is all you need, but most often it is the place you start.  For these releasing exercises you might want to play with the Diaphragmatic Breath, the Bucket Handle Breath, or the Pitcher Breath.  All of these breath patterns not only focus the breath, but the breath can begin expanding tight tissues in the spine. 

Before we actually stretch the muscles in the spine, it’s important to see what might be making the musculature of the spine tight in the first place.  Often rigidity in the hips sockets can lead to tightness in the piriformis and glutes, which will then translate into tightness and immobility in the spine.  To see if this is the case first start with a marker exercise in this case the Pelvic Rocks.


Then try these three exercise dedication to hip socket mobilization:


With all of these exercises be sure to keep the pelvis still while moving the thighbones in the socket.  In these exercises your hands are doing the work for the muscles in your hip and legs, which allows the muscles of the hip and legs to release.  Subsequently this often allows the muscles of the back to release too.

Now try your marker exercise again.  Rock your pelvis being sure to use the pelvic floor and belly muscles without the glutes and the hamstrings.  Is the range of motion different?  Is there less tension?  Listen to your back what is it telling you.

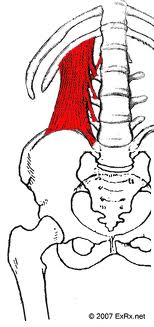
In the next recipe we want to address the Psoas.  Read the post “The Psoas and World Domination” to learn more about this very important and sometimes tyrannical muscle.  Releasing the psoas can lengthen the spine and open the front of the hips.   

In this recipe, the Bucket Handle Breath is the most efficient because you can focus this breath into the entire circumference of your ribcage allowing the top of the Psoas to release.  Did you know the Psoas and the Diaphragm are fascially connected?  When a person exhales the diaphragm lifts into the body and thus the lengthening of the Psoas begins before you are ever stretching.

After you have mastered the breath then begin with the following sequence of Psoas Stretches


The previous exercises are a progression from gentle stretch to a more intense stretch.  They can be substituted or done in sequence whatever time allows in your life. 

Finally, it’s time to stretch the muscles of the back.  If you have done the previous release work these stretches will be more effective and allow for more length in the muscle tissues of the low spine.  The following exercises are also a progression from gentler to more intense.


The exercises above create a wonderful space and time to find the breath in the back of the body.  Use the breath to lengthen the tissues as you stretch.

Now is the time to ask all of the questions from the first paragraph of this post.  You have taken the time to listen to your back, and allowed the muscles in your body the space to recuperate.  Maybe the answers will come a little easier.

Katrina Hawley C.M.A, R.S.M.E
Co-Director of The Pilates Studio


PS After all of this, your back may just be asking for an inner thigh squeeze.  It might even say please! 

Sunday, September 9, 2012

The Foot and Knee Pain


Last week I was reminded of the importance of the foot once again.  Over the past year you may have noticed that I’ve written a few different posts about the foot and exercises for the feet.  We have “Stomping Out Foot Pain with Pilates,” “Recipes for an Agile Foot,” and “Recipes For a Strong and Flexible Ankle” Not to mention the Pilates Exercise of the Day Blog dedicated the entire month of July to foot and ankle exercises.  It may seem that I’m obsessed.  I was even beginning to think so, but then a client came in with a foot question, we went on a foot tangent, and that tangent led to a decrease in her knee pain. 

With this information in mind, I once again started to compose a post about the foot. This post was to relate the foot to knee pain.  As I was writing I felt I was composing words that were very similar to what I had already written.  To check, I reread “Stomping out Foot Pain with Pilates” and with a little curiosity, I looked at the stats for that post.  And then I was floored.  That post has been seen twice as much as any of the other posts in The Pilates Studio’s blog. I could toot my own horn and say that the writing was brilliant so of course my post was seen so many more times, but I think realistically the trend here is that people are googling.  And people are googling about the foot and foot pain.  People are looking for different ideas about the foot.  People are starting to understand the importance of the foot and its relationship to knee, hip, and back pain.  The feet are being seen as more important in overall health.  So am I obsessed?  Well, not anymore than the rest of the google population…

I took this obsession to the University of Hartford’s Hartt School.  It’s the first week of classes and as faculty we observe the placement ballet classes to make sure that the students are placed in classes suited to their technical development.  Well as I was watching the students, once again I was observing how they use their feet.  Are they using their feet efficiently? Are they applying the foot articulation exercises built into the ballet barre to the work in the center?  And if I noticed that a student wasn’t articulating the foot efficiently, I asked myself what I knew about that particular student’s injury history, and well I must admit I was starting to see some correlations of the movement of the foot to ankle and knee injuries.  Was I ticking the data in any way that I could present scientifically as if there is a correlation coefficient of +.98 between movement of the foot and ankle and knee pain?  Well no not at all, but lets just say these observations didn’t dampen my foot obsession in the least.    

So will this be my last post about the movement of the feet?  I think it’s fair to say no.  Most likely at some point in the future I will feel compelled to write about the feet again and probably then again.  The good sign is the google stats are on my side we are a world obsessed with the feet.  They are our connection to the earth, they give us the spring in our step, and when they hurt they hurt a lot.  Ahh yes, back to my client’s foot and her knee pain, I simply taught her this “Recipe For an Agile Foot.” And it relieved her knee pain.  Will it relieve everyone’s knee pain?  I don’t think so, but I am confident that it should be a part of the puzzle for anyone out there!

Katrina Hawley C.M.A, R.S.M.E
Co-Director of The Pilates Studio      

Wednesday, August 29, 2012

All Things Bridge in Pilates


Do you know that the Pilates Bridge leads to a flexible and articulate spine, strengthens the hamstrings, creates a stabile pelvis, lengthens the hip flexors, relieves tension in the upper back and neck, increases lung capacity, relieves pain, increases height, improves balance and relieves stress? Is it a miracle?  No, and in fact on that note, no movement is a miracle. Movement seems magical because it isn’t given enough credit in this pill for everything world!  But, let me leave that soapbox to another post and tell you about the beauty of the bridge in all of its variations!

If you’re new to us you might not have heard of our Movement Recipes.  It is widely accepted that exercise is “good for you,” but the controversy enters when a person tries to decipher which kind of exercise is “best” for you.  At the Pilates Studio, there is no best exercise, there is problem solving.  The Pilates Movement Recipes that you’ll read over the next year all have goals and missions, and it is the process of traveling towards these goals (whether you reach them or not) that is “good for you” It is this process that creates the strong and healthy individuals who emerge from mindful movement.  

Follow this link to the Pilates Exercise of the Day Blog to find a simple explanation of the basic bridge.  Performed alone this exercise is fantastic, but if you want to increase the benefits towards specific goals you may want to try some of the following recipes.  Below are three Bridge Recipes!

First if you want to use the Pilates Bridge to create a flexible and articulate spine, try the following: Click the links for more information about each exercise:

Pitcher Breath Remember Breath is the Olive Oil of any Pilates Recipe, choosing the breath pattern is like choosing the first ingredient.  In this case, the pitcher breath can help address certain parts of the spine that might not articulate through the individual vertebra
Pelvic Rocks on the Soft Ball The soft ball aids in the pelvic rock initiation and can relieve some tightness and immobility in the low spine.  The Soft Ball also allows the pelvic floor to engage easily.
Bridge – In this case you are using the Bridge as a marker exercise to see how flexible and articulate your spine is.
Bridge Side Stepping – This exercise will help loosen the spine at individual vertebral joints to increase the articulation of each joint
Bridge with Figure Eight -  The figure eight continues to release individual vertebral joints. In this exercise your are working with minute spinal rotations.
Bridge – Does it feel different?  Can you feel the added mobility to the spine?


Try the following links if you want to use the bridge to create stronger hamstrings.  The following recipe can be used as a way to progress the bridge over several days, or if a goal is to really challenge the hamstrings the progression could happen over one workout.  As always be aware of the comfort in your movement, if the hamstrings are cramping then they are asking for a rest!

Neutral Bridge -  Doing the bridge with a neutral spine creates the opportunity to concentrate on the pelvic shift rather than the articulation of the spine.  


Bridge Marchingthe ability to lift one leg makes the standing legwork harder


Single Leg Bridge The next step that progresses towards hamstring strength is acquiring the ability to lift the pelvis with just a single leg.


Bridge with Neutral Spine on the Foam Roller -  The additional height of the Foam Roller increases the stress and thus strengthens the hamstrings


Single leg Bridge Feet on the Foam Roller Yowser! This one is hard!!!


Try the following recipe if Pelvic Stability is your goal!

Breath with Abdominal and Pelvic Floor Engagementit is important to find the relationship between the diaphragm and the pelvic floor
Inner Thigh Squeeze Soft Ball  - Allows the body to find the inner thighs which can aid in pelvic stability


Outer Thigh Squeeze Theraband Allow the body to find the external rotators for additional aid in pelvic stability


Pelvic RocksThis exercise isolates the initiation of the bridge
Bridge – The bridge in this recipe is the culmination and provides a synthesis opportunity for everything that was learned in this recipe.

There are many other Bridge Movement Recipes, The lovely thing about movement recipes is that you can create your own.  As I continue to create these recipes for you, I might need your help.  What are your movement goals?  What kind of movement recipe do you want?  Leave a note in the comments and I hope to write recipes for anyone that wants one!

Katrina Hawley C.M.A, R.S.M.E
Co-Director The Pilates Studio

Friday, August 24, 2012

Head Shoulders Knees and Toes: Kids songs and muscular relationships


Do you remember the song “Head, Shoulders, Knees, and Toes?” I happen to live with a four year old who loves all things bone, so these songs are very much a part of my consciousness.  I always find it remarkably funny how much these “body” songs are connected to the work that I do.   “Head, Shoulders, Knees, and Toes” is clearly a song about the first scan in a postural assessment.  First, I see if the head is even between the shoulders, I look to see if one shoulder is higher than the other, I see if the knee caps are pointing straight forward, I check where the toes are pointing, and then I look back at the knees to see if they line up with the toes.  There you have it: head shoulders knees and toes, knees and toes! Throw in some pelvis alignment and we’ve got ourselves a kid’s song!  Of course there’s more to it, but that’s where I start.  These bony landmarks are a great way to assess the relationships within the musculoskeletal system, which brings me to this week’s installment of “how do you remember all that?” Last week I talked about the Latin names of muscles as pneumonic devices that actually make it easy to remember them, this week I’ll talk about remembering muscular relationships because in actuality there would be no “Head, Shoulders, Knees and Toes” without the relationship between fascia, muscles, and bone.  I’ll finish with a story about a client who benefited directly from knowledge of these relationships.

The following memory tricks are based on the work of Tom Myers who developed Anatomy Trains as a way of analyzing muscle relationships in function.   When you are remembering relationships, muscular names are not necessary to achieve great function.  Tom Myers would go so far as to say that perseverating on the actions of individual muscles might even impede healthy function.  In real life no muscle acts alone, so isolating individual muscles does not create functional strength.  In general when I think of muscle groups I think Back, Front, Side, Inside and Spirals…These of course correlate to Tom Myers’ Superficial Front Line, Superficial Back Line, Lateral Line, Deep Front Line, and Spiral Line (along with his arm line and functional lines) The lovely thing about Tom Myers’ work is that while the theory can explain incredibly complex ideas with great detail and accuracy, it’s simplicity can also be broken down for anyone to understand and use for greater movement efficiency.

When I think of the Back of the Body (Superficial Back Line), I think of the bottom of the foot, the back of the lower leg, the back of the thigh, the back of the hips, the spine, the back of the neck and the skull wrapped around to the forehead.  These body parts work together to propel the body forward, hold the body upright, and bend the body backwards.     

When I think of the Front of the Body (Superficial Front Line), I think of the top of the toes, the front of the shins, the front of the thighs, the belly, the chest, the front of the neck, and the face.  These body parts curl the body into a ball, help us bend forward, and pull our body forward through space.

When I think of the Side of the Body (Lateral Line), I think of the bump on the side of the ankle (lateral malleolus), the side of the lower leg, the side of the thighs, the side of the hip, the waist, the side of the ribcage, and the side of the neck.  These muscular relationships help us bend to the side, and transfer weight so that we can lift one foot while walking.

When I think of the Inside of the Body (Deep Front Line), I think of the deep fascia in the foot, behind the bones of the lower leg, the inner thighs, the inside of the pelvis, right along the front of the spine, and believe it or not the tongue.  These muscular relationships are our center or our core.  They move the legs, stabilize the pelvis, and hold us up from the inside (think of a tent pole).

When I think of Spirals in the Body, I imagine a rubber band or string that connects the right ear to the left shoulder blade, then it wraps around the left side of the ribcage, and runs across the abdomen to the right hip.  Then this rubber band continues down the right inner thigh, moves around the front of the right lower leg, wraps around the bottom of the foot from the inside of the ankle to the outside of the ankle. Our imaginary rubber band continues to move up the side of the lower leg, and then up the back of the thigh.  Phew…I like to think of these Spiral relationships as the balancers in the body.  Imagine this scenario: If imbalances on the inside of the body cause the ribcage to rotate to the right, then the spirals in the body can adjust the head neck and shoulders so that anyone with this spinal rotation doesn’t have to spend his or her life walking around in a circle (yay for homeostasis).     

Now of course these descriptions are quite simplified. Basically I reduced Anatomy Trains into five paragraphs, which in many ways is a travesty to the depth of information in this fabulous book.  But if you’ll forgive me, I want to explain how I used the simplicity of this in depth theory with a client recently.  This person returned to The Pilates Studio after a time away, and as she was communicating the “status” of her body, she talked about a shoulder that was causing pain.  After some conversation, we both determined that probably there was some sort of impingement in the shoulder, and I certainly had a few movement recipes in mind for her shoulder.  Then she said something that gave me pause.  She talked about feeling tightness over her entire body.  She has some scoliotic rotations in the spine, which we had worked with in the past, but the stiffness she spoke of was not something I had heard from her before.  This led me to a different strategy with her, even though I knew what I wanted to do for her shoulder I decided to postpone shoulder specific exercises for a few sessions.  

First we worked with the relationship of the back of the body to the front of the body. We bent forward and backward, we released tight spots and strengthened weak spots.  We played with flexion and extension of the spine.  We worked to make the bottom of the feet malleable, and we played with flexion and extension of the ankle and the hip.  Then we began working with the side of the body and the inside of the body.  We flexed the spine from side to side.  We strengthened the side of the hips. We lengthened the muscles that run in front of the spine. And finally we played with spirals.  I used the very simplified information as a structure to choose Pilates exercises, and my only goal was to relieve the feeling of stiffness.  The funny side effect was that well, her shoulder started feeling better before I ever addressed it directly.  It wasn’t perfect, but the range of motion improved, and the pain decreased.  By the time we started working with shoulder motion directly, we were working with a shoulder that was not as acute as the beginning of her sessions.

Now one of my pet peeves is using an anecdotal story (like the one I just told) and then spouting causal relationships as if the anecdote of one person’s movement experience proves anything.    I could list so many other things that could have contributed to this client’s decrease in shoulder pain.  There was no “control” in our work together, we were simply two people problem solving and moving together.  We allowed ourselves to be creative, and now I have another anecdote that I can add to the plethora of anecdotes that have shaped my practice over the years. 

Well then what do I know? I do know that working with muscular relationships rather than isolating individual muscles will create a powerful movement experience for any person.  I also know that if you watch a baby rolling around on the floor, you will see that we are born with this innate knowledge that somehow disappears.  I also know that “Head Shoulders Knees and Toes” has been running through my head since I started writing this post, and I hope that I have not passed that onto you.  But beyond that I am simply a mover that is teaching other people to move, and if you’re still wondering how I remember all that…Just think about all of the connections in your world that allow you to remember all that you do, and well that’s how I remember all that.

Katrina Hawley C.M.A, R.S.M.E
Co-director of The Pilates Studio

Thursday, August 16, 2012

The Latin in Muscle Names can be Helpful?

The other day, a client asked me how is it that I can remember the muscle names so easily.  I started explaining how I had been studying anatomy forever, and with practice these names start to come easier, but then I remembered something.  My very first anatomy teacher while staring at a group of nineteen-year-old college students, once said, “Remembering the names of muscles is easy.” Of course our angst-ridden response was probably, “Maybe for you.” But then she went on to explain something.  Each muscle name is descriptive.  The muscle names most often do one or two of the following things:

1.     Describe the shape of the muscle
2.     Describe the consistency of the muscle
3.     Describe the function of the muscle
4.     Describe the location of the muscle

And with that she went on to say remembering these four rules will make learning the musculo- skeletal anatomy easy because each name is a pneumonic device.  I was a very skeptical nineteen-year-old, so much so that until the day my client asked me how I remembered the muscle names, I had blocked out this learning process entirely.  But the memory has come back and I now realize that every time someone says Quadratus Lumborum, I automatically think “Square muscle next to the Lumbar spine” or if somebody says Adductor Magnus, I automatically think, “The really big one.”  First of all my professor of so many years ago was absolutely right, and she was such a great teacher that it was years before I realized exactly how much she taught me.  So here’s a shout out to Professor Dee Forrest at Western Wyoming College, because in the publish or perish world of universities, I want to honor a professor that was also a great teacher. 

The following is a list of the Latin Pneumonics that have been burned into my brain…For the Latin experts out there, I have never ever taken a Latin class; so if there are any inaccuracies please except my apologies.  That’s the best thing about pneumonic devices they help me remember the muscles whether the Latin is accurate or not.  At nineteen I learned a great way to remember muscle names and at thirty one after quite a few years in practice, I learned an even better way to think about muscular relationships, and that will be the subject of next week's post!  Stay Tuned!   

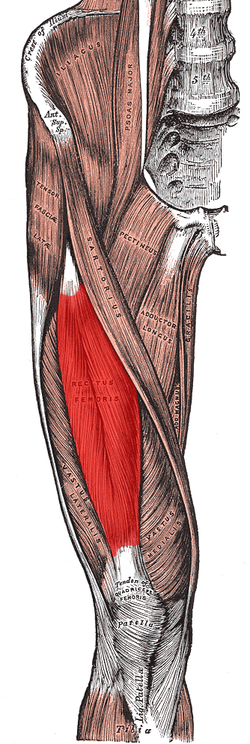
Muscle names that describe the shape of the muscle: Often the shape and the location go together so some of these names have both a shape and a location descriptor.  (I found a few pictures to show some of the shapes)

Quadratus Lumborum: Square muscle next to the lumbar spine

Quadratus Femoris: Square muscle close to the femur

Gluteus Maximus: The big glute

Gluteus Medius: The medium glute  

Gluteus Minimus: The little glute

Rectus Femoris: up and down the femur (thigh)

Rectus Abdominis: up and down the abdomin

Triceps: Three heads

Trapezius: Trapezoid

Serratus Anterior:  Serrated muscle in front

Serratus Posterior: Serrated muscle in back

Muscle names that describe the consistency of the muscle

Semi-tendonosis: tendon like muscle

Semi-Membranosis: muscle that is gooey like a membrane

Gracilis: muscle like gristle

Muscle names that describe the function of the muscle

Erector Spinae: Muscle that keeps spine erect

Multifidi: Multifunction muscle of the spine

Rotares: rotates the spine

Flexor Hallucis Longus: Flexes the big toe (its also long)

Extensor Hallucis Longus: Extends the big toe

Flexor Digitorum Longus: Flexes the other toes

Extensor Digitorum Longus: Extends the other toes

Adductor Longus: Adducts leg

Adductor Brevis: Adducts leg

Muscles that describe the Location of the muscle

Tibialis Anterior: Muscle in front of the Tibia

Tibialis Posterior: Muscle in back of the Tibia

Biceps Femoris: Two headed muscle on the femur

Biceps Brachii: Two headed muscle on the arm 

Wednesday, August 8, 2012

Breath: The Olive Oil of any Pilates Exercise!


We’ve all heard of super foods and the “miracles” that they create…But whenever I hear someone speak of the benefits of olive oil, I find myself wondering how awesome I’d be if I could take a shot of olive oil at every meal.  Seriously I’ve almost bought a shot glass for this very purpose…It’s so simple and easy to use, and olive oil can literally cure ills.  The “miracle” that I feel in olive oil is that it is not pharmaceutical.  olive oils aren’t concocted in chemistry labs; olives grow on trees and are pressed for oil.  Why isn’t olive oil the most obvious choice?  Why don’t we start with olive oil?  Actually many recipes do start with olive oil…

This brings me to the Pilates Exercise of the Day Recipe Cards.  So far we have created recipes for agile feet and strong and flexible ankles, and for the last ten days the Pilates Exercise of the day has been a different breath pattern.  I’m sure that you have been waiting with baited breath for the breath recipe card.  Well, my friends that would be like handing you a recipe card listing ten different kinds of olive oil and calling it soup.  Breath is the beginning; it is the place to start.  It is the one principle of pilates that is consistent in all of the pilates studies and writings.  Breath is the olive oil of any Pilates Recipe.

Just this morning I was working with a new client, and she told me about a muscle spasm underneath her shoulder blade that happened every time she performed certain actions.  As she was talking about the movement that this mystery spasm prohibited, I started mapping out a strategy in my mind, a recipe of sorts.   Well this recipe started with breath.  I watched the action of her breath. Then I placed my hand on the place that hurt, asked her to breath into my hand.  She took a few breaths, and I felt the tissue under my hand expand.   Suddenly, she sat up and said, “It’s gone!”  And then preceded to do all of the movements that she had just told me were impossible because of this pain underneath her shoulder blade.  Now, this was no miracle. It just so happens that she had never cooked with olive oil before.  

Is a years worth of pain relieved every time I ask someone to breath into my hand?  Is breath that much of a miracle?  Of course not!  This woman had tried many things to relieve this pain, but this was the first time that her “recipe” had breath as the first ingredient.  During the session, we continued to move and correct muscular imbalances that may have helped to cause the pain, but we started with breath, just like lots of great and healthy recipes start with Olive Oil.   

So now below when I list links to the breath patterns on the Pilates Exercise of the Day Blog, consider it as a shelf full of gourmet olive oils.  Each with subtle variations to get the most out of any Pilates exercise. 

Katrina Hawley C.M.A, R.S.M.E
Co-Director of The Pilates Studio

P.S.  As I was sitting at Esselon cafĂ© typing this blog post Jenni one of the fabulous instructors at The Pilates Studio, who you might only know as the model in the Pilates Exercise of the Day Blog, came in and asked about the post.  As we were chatting, she laughed and told me how sore her deep abdominal muscles were the day after we took all of the breath pattern pictures. …Hmmm another reason to always start with the breath!